ShoulderDolly Instructions
STEPS TO ENSURE A SAFE AND SUCCESSFUL SHOULDERDOLLY EXPERIENCE:
Read all instructions and view this online video before use. Do not use this product unless you fully understand these instructions. Manufacturer is not responsible for any misuse or misrepresentation of the ShoulderDolly.®
Download Detailed Instructions >
Download Detailed Instructions >
ENGLISH INSTRUCTIONS - INSTRUCCIONES EN ESPAÑOL - DEUTSCHE ANLEITUNG - INSTRUCTIONS EN FRANÇAIS - ISTRUZIONI PER L'ITALIANO
Quick Guide
While we recommend reading the detailed instructions, for those who have short attention spans, here you go!
While we recommend reading the detailed instructions, for those who have short attention spans, here you go!


USING OPTIONAL SHOULDERDOLLY® ARM LOOPS FOR HIGHER LIFTS
Note: Only use the optional arm loops for higher lifting (i.e. lifting onto a truck tailgate or loading dock), not while walking.
 Warning! Do not use both the shoulder harness and arm loops at the same time!
 |
| Insert lifting strap into tension buckle and adjust length. Position the loops on the forearm, near the elbow. |


Detailed Guide
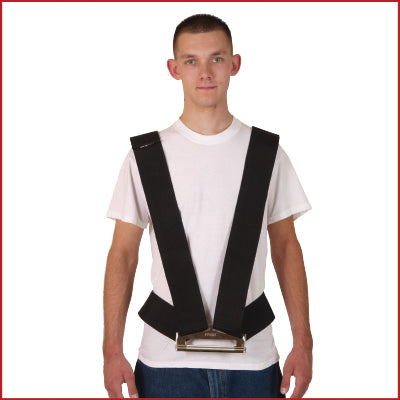
Step 1: Have both lifters put the harness on over their heads — make sure the buckle is in front of you and the word “FRONT” is facing out (not towards your body). The “X” on the back of the harness should be in the middle of your back. (See figure 1 and Figure 2)

Step 2: Place the 12” x 5” long lifting strap under the bulk of the weight of the object you wish to move. You can either tip the object and slide the strap under, or if the object has legs, you can slide it under from one side. The strap should be under the majority of the weight – Eg: place towards the back of a couch. (See Figure 3)
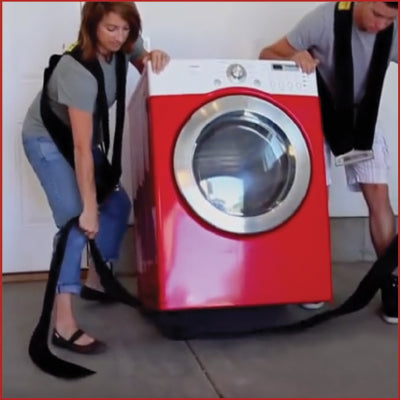
Step 3: Position your body into a semi-squat by bending your knees — the deeper you squat, the higher the item will be lifted. Keep your back in an upright straight position, don’t lean toward the object. (See Figure 4)


Step 4: Weave the lifting strap through the buckle – Start with webbing going under the buckle, then weave behind the larger metal rod (closest to your body), then over the top and then thread it down between the two rods. Pull the webbing through the buckle until tight. (See Figure 5)
Step 5: To adjust the length of strap – turn the buckle horizontal to the ground, then pull on the top piece of the strap to make it tighter or the long end to make it shorter. When the buckle is vertical, the buckle will lock and allow you to stand up and lift.
Step 6: Adjust the length of the strap so that when you stand up, there is some tension on your shoulders. If one person is taller, then they’ll have more webbing from the floor to the buckle than the shorter person.
Step 7: There may be excess webbing after you lift the object. To ensure that you don’t trip over the excess webbing, tie it around your body, or tuck it between the harness and your body.
Step 8: With straight arms, push against the object you are moving (VERY IMPORTANT!) this will keep your back in proper ergonomic alignment and put the weight of the object on your legs and shoulders. (See Figure 6)


Step 9: Simultaneously push against the object with your arms until they are straight, and slowly straighten your legs – balancing the object with your arms and hands. (See Figure 7)
Step 10: Communicate at all times with your lifting partner during lift and throughout the move.
.
INSTRUCCIONES EN ESPAÑOL
Lea todas las instrucciones y vea este vídeo en línea antes de utilizar el producto. No utilice este producto a menos que entienda completamente estas instrucciones. El fabricante no se responsabiliza del mal uso o la tergiversación del ShoulderDolly.®.
Guía rápida
Aunque recomendamos leer las instrucciones detalladas, para los que tengan poca capacidad de atención, aquí tiene.
Aunque recomendamos leer las instrucciones detalladas, para los que tengan poca capacidad de atención, aquí tiene.
UTILIZANDO LOS LAZOS DE BRAZO OPCIONALES DE SHOULDERDOLLY® PARA ELEVACIONES MÁS ALTAS
Nota: Utilice los lazos de brazo opcionales sólo para elevaciones más altas (por ejemplo, para subir a la puerta trasera de un camión o a un muelle de carga), no mientras camina.
¡Atención! No utilice el arnés para los hombros y los lazos para los brazos al mismo tiempo. |
| Inserte la correa de elevación en la hebilla de tensión y ajuste la longitud. Coloque los lazos en el antebrazo, cerca del codo. |
Guía detallada
Paso 1: Haga que ambos levantadores se pongan el arnés por encima de la cabeza - asegúrese de que la hebilla está delante de usted y la palabra "FRONT" está mirando hacia fuera (no hacia su cuerpo). La "X" en la parte posterior del arnés debe estar en el centro de su espalda. (Ver figura 1 y figura 2)
Paso 2: Coloque la correa de elevación de 12" x 5" de largo bajo la mayor parte del peso del objeto que desea mover. Puede inclinar el objeto y deslizar la correa por debajo, o si el objeto tiene patas, puede deslizarla por debajo desde un lado. La correa debe colocarse debajo de la mayor parte del peso, por ejemplo, hacia la parte trasera de un sofá. (Véase la figura 3)
Paso 3: Coloque el cuerpo en semicuclillas doblando las rodillas: cuanto más en cuclillas esté, más alto se levantará el objeto. Mantenga la espalda recta, no se incline hacia el objeto. (Véase la figura 4)
Paso 4: Pase la cinta de izado por la hebilla - Empiece pasando la cinta por debajo de la hebilla, luego pase por detrás de la varilla metálica más grande (la más cercana al cuerpo), luego por encima y luego pásela por entre las dos varillas. Tire de la cinta a través de la hebilla hasta que quede apretada. (Véase la figura 5)
Paso 5: Para ajustar la longitud de la correa - gire la hebilla horizontalmente hacia el suelo, luego tire de la pieza superior de la correa para apretarla o del extremo largo para acortarla. Cuando la hebilla esté vertical, la hebilla se bloqueará y le permitirá ponerse de pie y levantarse.
Paso 6: Ajusta la longitud de la correa de modo que, cuando te pongas de pie, haya cierta tensión en los hombros. Si una persona es más alta, tendrá más cinta desde el suelo hasta la hebilla que la persona más baja.
Paso 7: Puede haber un exceso de cinta después de levantar el objeto. Para asegurarse de no tropezar con la cinta sobrante, átela alrededor del cuerpo o métala entre el arnés y el cuerpo..
Paso 8: Con los brazos rectos, empuje contra el objeto que está moviendo (¡MUY IMPORTANTE!) esto mantendrá su espalda en la alineación ergonómica adecuada y pondrá el peso del objeto sobre sus piernas y hombros. (Ver Figura 6)
Paso 9: Empuje simultáneamente contra el objeto con los brazos hasta que estén rectos y estire lentamente las piernas, equilibrando el objeto con los brazos y las manos. (Véase la figura 7)
Paso 10: Comuníquese en todo momento con su compañero de elevación durante la elevación y durante todo el movimiento.
.
DEUTSCHE ANLEITUNG
Kurzer Leitfaden
Wir empfehlen zwar, die ausführliche Anleitung zu lesen, aber für diejenigen, die eine kurze Aufmerksamkeitsspanne haben, geht's hier weiter!
Wir empfehlen zwar, die ausführliche Anleitung zu lesen, aber für diejenigen, die eine kurze Aufmerksamkeitsspanne haben, geht's hier weiter!
VERWENDUNG DER OPTIONALEN SHOULDERDOLLY®-ARMSCHLAUFEN FÜR HÖHERE HEBUNGEN
Hinweis: Verwenden Sie die optionalen Armschlaufen nur für höheres Heben (z. B. auf eine LKW-Heckklappe oder Laderampe), nicht beim Gehen.
Achtung! Verwenden Sie die Schultergurte und die Armschlaufen nicht gleichzeitig! |
| Stecken Sie das Hebeband in die Spannschnalle und stellen Sie die Länge ein. Positionieren Sie die Schlaufen am Unterarm, in der Nähe des Ellenbogens. |
Ausführlicher Leitfaden
Schritt 1: Lassen Sie beide Lifter das Gurtzeug über den Kopf anlegen - achten Sie darauf, dass die Schnalle vor Ihnen liegt und das Wort "FRONT" nach außen zeigt (nicht zum Körper hin). Das "X" auf der Rückseite des Gurtes sollte sich in der Mitte deines Rückens befinden. (Siehe Abbildung 1 und Abbildung 2)
Schritt 2: Legen Sie den 12" x 5" langen Hebegurt unter den Großteil des Gewichts des zu bewegenden Objekts. Sie können das Objekt entweder kippen und den Gurt darunter schieben, oder wenn das Objekt Beine hat, können Sie es von einer Seite aus darunter schieben. Der Gurt sollte sich unter dem größten Teil des Gewichts befinden - z. B. in Richtung der Rückseite einer Couch. (Siehe Abbildung 3)
Schritt 3: Bringen Sie Ihren Körper in eine halbhockende Position, indem Sie Ihre Knie beugen - je tiefer Sie in die Hocke gehen, desto höher wird der Gegenstand angehoben. Halten Sie Ihren Rücken in einer aufrechten, geraden Position, lehnen Sie sich nicht in Richtung des Objekts. (Siehe Abbildung 4)
Schritt 4: Weben Sie das Hebeband durch die Schnalle - Beginnen Sie mit dem Gurtband, das unter der Schnalle hindurchgeht, weben Sie es hinter den größeren Metallstab (der dem Körper am nächsten ist), dann über den oberen und fädeln Sie es dann zwischen den beiden Stäben nach unten. Ziehen Sie das Gurtband durch die Schnalle, bis es fest sitzt. (Siehe Abbildung 5)
Schritt 5: Um die Länge des Gurtes einzustellen, drehen Sie die Schnalle waagerecht zum Boden und ziehen Sie dann am oberen Teil des Gurtes, um ihn enger zu ziehen, oder am langen Ende, um ihn zu verkürzen. Wenn die Schnalle senkrecht steht, rastet sie ein und Sie können aufstehen und anheben.
Schritt 6: Stellen Sie die Länge des Gurtes so ein, dass beim Aufstehen eine gewisse Spannung auf Ihren Schultern liegt. Wenn eine Person größer ist, hat sie mehr Gurtband vom Boden bis zur Schnalle als die kleinere Person.
Schritt 7: Nach dem Anheben des Objekts kann überschüssiges Gurtband vorhanden sein. Um sicherzustellen, dass Sie nicht über das überschüssige Gurtband stolpern, binden Sie es um Ihren Körper oder verstauen Sie es zwischen dem Gurt und Ihrem Körper.
Schritt 8: Drücken Sie sich mit gestreckten Armen gegen das zu bewegende Objekt (SEHR WICHTIG!), um Ihren Rücken in der richtigen ergonomischen Ausrichtung zu halten und das Gewicht des Objekts auf Ihre Beine und Schultern zu verlagern. (Siehe Abbildung 6)
Schritt 9: Drücken Sie gleichzeitig mit den Armen gegen den Gegenstand, bis sie gerade sind, und strecken Sie langsam die Beine durch, wobei Sie den Gegenstand mit den Armen und Händen ausbalancieren. (Siehe Abbildung 7)
Schritt 10: Kommunizieren Sie während des Hebens und während des gesamten Transfers stets mit Ihrem Hebepartner.
.
INSTRUCTIONS EN FRANÇAIS :
Guide rapide
Nous recommandons de lire les instructions détaillées, mais pour ceux qui n'ont pas une grande capacité d'attention, voici ce qu'il faut faire !
Nous recommandons de lire les instructions détaillées, mais pour ceux qui n'ont pas une grande capacité d'attention, voici ce qu'il faut faire !
UTILISATION DES BOUCLES DE BRAS DU SHOULDERDOLLY® EN OPTION POUR DES LEVÉES PLUS IMPORTANTES
Remarque : les boucles de bras optionnelles ne doivent être utilisées que pour des levages plus importants (par exemple, pour monter sur le hayon d'un camion ou sur un quai de chargement), et non pas en marchant.
Attention ! N'utilisez pas simultanément le harnais d'épaule et les boucles de bras ! |
| Insérer la sangle de levage dans la boucle de tension et régler la longueur. Positionner les boucles sur l'avant-bras, près du coude. |
Guide détaillé
Étape 1 : Demandez aux deux lifteurs de mettre le harnais au-dessus de leur tête - assurez-vous que la boucle est devant vous et que le mot "FRONT" est tourné vers l'extérieur (pas vers votre corps). Le "X" à l'arrière du harnais doit se trouver au milieu de votre dos. (Voir figure 1 et figure 2)
Étape 2 : Placez la sangle de levage de 12" x 5" sous la plus grande partie du poids de l'objet que vous souhaitez déplacer. Vous pouvez soit basculer l'objet et glisser la sangle en dessous, soit, si l'objet a des pieds, la glisser d'un côté. La sangle doit être placée sous la plus grande partie du poids - par exemple, vers l'arrière d'un canapé. (Voir figure 3)
Étape 3 : Placez votre corps en position semi-squat en pliant les genoux - plus vous vous accroupissez, plus l'objet sera soulevé haut. Gardez le dos droit, ne vous penchez pas vers l'objet. (Voir figure 4)
Étape 4 : Faites passer la sangle de levage dans la boucle - Commencez par faire passer la sangle sous la boucle, puis derrière la plus grande tige métallique (la plus proche de votre corps), puis par-dessus, et enfin entre les deux tiges. Tirez la sangle à travers la boucle jusqu'à ce qu'elle soit bien serrée. (Voir figure 5)
Étape 5 : Pour régler la longueur de la sangle, tournez la boucle à l'horizontale par rapport au sol, puis tirez sur la partie supérieure de la sangle pour la resserrer ou sur l'extrémité longue pour la raccourcir. Lorsque la boucle est à la verticale, elle se verrouille et vous permet de vous lever et de soulever.
Étape 6 : Ajustez la longueur de la sangle de manière à ce que, lorsque vous vous levez, vos épaules soient tendues. Si une personne est plus grande, elle aura plus de sangle entre le sol et la boucle que la personne plus petite.
Étape 7 : Il peut y avoir un excès de sangle après avoir soulevé l'objet. Pour vous assurer de ne pas trébucher sur l'excédent de sangle, nouez-le autour de votre corps ou placez-le entre le harnais et votre corps.
Étape 8 : Avec les bras tendus, poussez contre l'objet que vous déplacez (TRÈS IMPORTANT !). Cela maintiendra votre dos dans un alignement ergonomique correct et placera le poids de l'objet sur vos jambes et vos épaules. (Voir figure 6)
Étape 9 : Poussez simultanément contre l'objet avec vos bras jusqu'à ce qu'ils soient tendus, et redressez lentement vos jambes - en équilibrant l'objet avec vos bras et vos mains. (Voir figure 7)
Étape 10 : Communiquez à tout moment avec votre partenaire de levage pendant le levage et tout au long du mouvement.
.
ISTRUZIONI PER L'ITALIANO
Guida rapida
Sebbene si consigli di leggere le istruzioni dettagliate, per coloro che hanno tempi di attenzione ridotti, eccovi accontentati!
Sebbene si consigli di leggere le istruzioni dettagliate, per coloro che hanno tempi di attenzione ridotti, eccovi accontentati!
UTILIZZANDO GLI ANELLI PER LE BRACCIA DEL SHOULDERDOLLY® OPZIONALE PER SOLLEVAMENTI PIÙ ELEVATI
Nota: utilizzare i passanti opzionali per le braccia solo per i sollevamenti più alti (ad esempio, per il sollevamento sul portellone di un camion o su una banchina di carico), non per camminare.
Attenzione! Non utilizzare contemporaneamente l'imbracatura per le spalle e gli occhielli per le braccia! |
| Inserire la cinghia di sollevamento nella fibbia di tensione e regolare la lunghezza. Posizionare gli occhielli sull'avambraccio, vicino al gomito. |
 |
| Con la schiena dritta, piegare le ginocchia e regolare la cinghia all'altezza di sollevamento desiderata. |
Guida dettagliata
Fase 1: chiedere a entrambi i sollevatori di indossare l'imbracatura sopra la testa - assicurarsi che la fibbia sia di fronte a voi e che la parola "FRONT" sia rivolta verso l'esterno (non verso il corpo). La "X" sul retro dell'imbracatura deve trovarsi al centro della schiena. (Vedi figura 1 e figura 2)
Fase 2: posizionare la cinghia di sollevamento lunga 12" x 5" sotto la maggior parte del peso dell'oggetto che si desidera spostare. Si può ribaltare l'oggetto e far scorrere la cinghia sotto, oppure, se l'oggetto ha le gambe, si può far scorrere sotto da un lato. La cinghia deve essere posizionata sotto la maggior parte del peso, ad esempio verso la parte posteriore di un divano. (Vedi Figura 3)
Fase 3: posizionare il corpo in una posizione di semi-squat piegando le ginocchia - più profondo è l'accovacciamento, più alto sarà l'oggetto sollevato. Mantenete la schiena dritta, senza sporgervi verso l'oggetto. (Vedi Figura 4)
Fase 4: intrecciare la cinghia di sollevamento attraverso la fibbia - Iniziare con la fettuccia che passa sotto la fibbia, quindi intrecciarla dietro l'asta metallica più grande (più vicina al corpo), poi sopra la parte superiore e infine infilarla tra le due aste. Tirate la fettuccia attraverso la fibbia fino a stringerla. (Vedi Figura 5)
Fase 5: Per regolare la lunghezza della cinghia, girare la fibbia in orizzontale rispetto al terreno, quindi tirare la parte superiore della cinghia per stringerla o l'estremità lunga per accorciarla. Quando la fibbia è verticale, si blocca e consente di alzarsi e sollevarsi.
Fase 6: Regolare la lunghezza della cinghia in modo che, quando ci si alza, ci sia una certa tensione sulle spalle. Se una persona è più alta, avrà più fettuccia dal pavimento alla fibbia rispetto alla persona più bassa.
Fase 7: Dopo aver sollevato l'oggetto, è possibile che rimanga della fettuccia in eccesso. Per evitare di inciampare nella fettuccia in eccesso, legatela intorno al corpo o infilatela tra l'imbracatura e il corpo.
Fase 8: con le braccia dritte, spingere contro l'oggetto che si sta spostando (MOLTO IMPORTANTE!) per mantenere la schiena in un allineamento ergonomico corretto e scaricare il peso dell'oggetto sulle gambe e sulle spalle. (Vedere Figura 6)
Fase 9: spingere contemporaneamente contro l'oggetto con le braccia finché non sono dritte e raddrizzare lentamente le gambe, bilanciando l'oggetto con le braccia e le mani. (Vedi Figura 7)
Fase 10: Comunicare sempre con il compagno di sollevamento durante il sollevamento e per tutta la durata dello spostamento.
Follow
Sign up to get the latest on sales, new releases and more …
© 2026 ShoulderDolly.
SHOULDER DOLLY ® is a registered trademark of DEN, INC., licensed to NIELSEN PRODUCTS, LLC. All Rights Reserved US and International Patents. Copyright © 2024 Nielsen Products, LLC - All Rights Reserved.